Experimentation of Taste

A food blog that catalogs discovery of foods available through CSA Farms Shares and other arenas and the recipes to enhance the flavors.

9.30.2006

The classic craving combined


Today was a lovely day. My husband and I enjoyed some leisure time by borrowing a friend’s sailboat and having two hours of leisure on a local lake. The trip was relaxing, but my thoughts turned to poor Cate at Sweetnicks, who is prepping to move and probably not having a very relaxing start to her weekend. She has asked us all to bring our “Go-to” dish to I'll Show You Mine If You Show Me Yours #5. I imagine Cate could use some of my double chocolate bread when her bowls are all packed from the move and that Egg McMuffin from the local golden arches doesn’t sound appetizing.

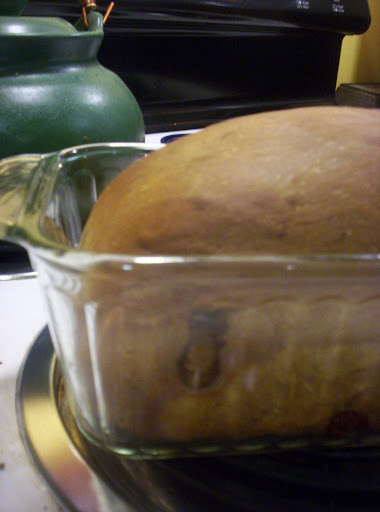
I took this bread to one potluck and now it is requested frequently by friends who invite us over for dinner. Some days I am lazy and let the bread maker to do all the work, on other days I just miss the feel of bread dough and I’ll mix up a batch by hand. My most requested bread is Double Chocolate Yeast Bread. It has just enough sweetness not to overpower but all that great yeasty goodness that we all enjoy right out of the oven.


Double Chocolate Bread
1 ½ pound loaf (16 slices)

My recipe is a bread machine recipe that I have had to fine-tune to work just right. I have included instructions for those of you who would like to cook this bread outside of a machine.

  • ¾ c milk
  • 1 egg
  • 2 T water
  • 1 T butter, cut up
  • 1 ½ t vanilla
  • 3 c bread flour
  • 3 T packed brown sugar
  • 4 t unsweetened cocoa powder
  • ¾ t salt
  • 1 t active dry yeast
  • 2/3 c (4 oz) semisweet chocolate pieces (or your favorite chocolate chip) taken straight from the freezer


  1. Add the ingredients to the machine according to manufacturer’s directions or mix in the regular bread order by hand.

  2. For the bread maker select basic white cycle with a light crust (my machine undercooks this bread with a light crust so I use medium.) or pick the dough cycle which has a rise time of one hour included.

  3. The rest of the steps are for non-machine baking – after the first rise, remove, punch down, let rest 10 min, and shape into 2 loaf pans.

  4. Place in a room temperature area with no draft. Let rise for 55 minutes.

  5. Preheat oven to 375 F. After placing loaves into the oven lower to 350 F. Cook for 30 min till internal temp reaches 204 F and the bottom of the loaf is hard. Because of the chocolate, this bread is hard to judge when it is done by color.


Recipe Follows

9.29.2006

Weekend Cookbook challenge: “The Northwest Essentials Cookbook"


Tabblo: Weekend Cookbook Challenge #9: Northwest Ingredients

Sara at I Like to Cook recently had herWeekend Cookbook Challenge mentioned in a major newspaper about blogging events. The article specifically mentioned this wonderful adventure in cookbook exploration. I envy those with loads and loads of cookbooks since my collection is limited to what fits neatly above the stove. If that space ever got overcrowded I don’t know what I would do with the surplus. Therefore, I dutifully review what has been accumulating and decid what to keep. My older books are tried and true, so mainly I decide about recent additions. My dilemma continues as magazines seem to be multiplying like rabbits up there. At least it provides fodder for the cookbook challenge!

A friend gave me Greg Atkinson’s Northwest Essentials cookbook for my birthday soon after I moved to the Pacific Northwest from the Deep South. It collected dust for two years until a sale on salmon filets kindled some interest in cooking fish. The filets were a real head scratcher since my interest wasn’t backed by any know-how. My lack of experience about fish goes way back. Dad’s idea of fish is Gorton’s fish sticks. In fact his doctor tells him to eat fish and he hates it. The fish turned out to be a good idea and this cookbook saved the meal.

I like the simple-to-follow instructions and details given about each featured Northwest treat. Atkinson wrote chapters about: Apples & Pears, Salmon, Stone Fruits, Herbs, Oysters, Prawns & Crab, Wild Mushrooms, Berries, Mussels, Clams & Scallops, Other Fish in the Sea, Lentils, Split Peas & Chickpeas, and lastly Hazelnuts. He describes the history or nostalgia associated with each item and why each is specifically associated with the region.

I have really enjoyed this delightfully uncomplicated salmon recipe. It fit my budget and schedule well.

Buying Salmon: The quality and price of the salmon will depend on its origin and how it was caught. Wild‑caughtCopper River Salmon tends to be the most expensive and high‑quality whereas farm‑raised Atlantic Salmon is much cheaper. The biggest difference between the types
is the potential health risk and environmental concerns about aquaculture. I personally don’t notice a difference in the quality of fish. If you are inexperienced at prepping your fish, ask your store’s meat department to filet it for you. The waste fish parts (head, etc) can be used to make a nice stock or for crab bait.

Cooking methods: King salmon cooks well on the BBQ. All salmon do well in the broiler, especially silvers that which tend to dry out on the BBQ. Baked salmon is moist and flavorful without much effort. A classy parchment paper parcel can steam themselves effortlessly for entertaining. Poached salmon creates its own sauce and adds flavor. Alder-plank-smoked salmon has layers of flavor and is a Northwest tradition.

Flavor Companions: Blackberries, Citrus, Sorrel, Tarragon, Watercress, Dill and other favorite herbs

Perfect Oven-Broiled Salmon

Serves 4
Prep 5 min
Total Time 15 min

  • 1 side of salmon (about 2 lbs) or 4 8 oz fillets.(Any size has worked for me) skin on
  • 2 T of vegetable oil
  • Kosher salt and Pepper
  • Blackberry Butter Sauce or Three Citrus Butter (I have included the Blackberry)


    1. Set up the oven racks so that the salmon will be as close to 6 in (no less) from the heating element and set your broiler to preheat (If your broiler gives you a choice use the high setting.)
    2. Prep the broiler pan with foil on the bottom and spray the top with oil. Brush or Spray the salmon with oil and sprinkle with salt and pepper.
    3. Place salmon in the oven for 5 minutes. Turn off and leave the fish in the oven for another 5 min without opening the door. They should be cooked to perfection if they are of average thickness.


    Blackberry Butter Sauce

    Serves 6 or a few more

  • ½ c blackberries or similar berry
  • Juice of 1 lemon, about 3T
  • 2 T sugar
  • ¼ c white wine or grape juice with a splash of vinegar
  • 1 t crushed garlic
  • salt and pepper
  • 1 ½ cups (3 sticks) unsalted butter, cold, cut into 1 inch chunks


    1. Puree the blackberries with the lemon juice, sugar,wine, garlic, salt and pepper in a blender or in the pot with an immersion blender. Strain if you don’t like seeds.
    2. Boil rapidly over high heat until puree is reduced to ¼ cup.
    3. Quickly stir in butter. Do not return to a boil.
    4. Serve immediately over fish
    5. Can be kept in the fridge for up to a year.

    I served this with locally grown edible flower salad mix and sweet corn from my CSA.And here is the rest of it.

    Recipe Follows

    9.28.2006

    WHB # 52 What is your favorite herb?


    Tabblo: WHB What's your favorite herb?

    I would really like to know how to make pasta. I am a bread guru and it seems pasta should be simpler than that. Alas, my attempt to make Gnocchi went awry, so now I go to the store and buy fresh pasta. Two words, however, might revive my fervor for making pasta from scratch – squash ravioli.

    My good friends know that I hoard squash. When I see squash for less than 50 cents a pound I squeal in delight. Sometimes I pick up the squash just to pet it appreciatively. I’m sure part of this comes from growing up in Saudi Arabia. All the squash there is irradiated, expensive, and gross. I may even be provoked into international humanitarianism to help those poor Arabs who are deprived of squash.

    I am happy to post this feature for Kayln’s Kitchen’s first anniversary of weekend herb blogging. Sadly, squash ravioli is not the substance of my favorite herb dish – Ravioli with Brown Butter Sauce and Fried Sage Leaves.

    The choice of sage as my favorite herb wasn’t easy. I’ve enjoyed Rosemary since I bought my first bush as a practical joke on my best friend and decorated it as a Christmas tree. Thyme had an interest too as it’s a part of my favorite herb mixture za’atar which I add to lots of things including my tomato sauce. I thought of Mint – since Longview has a history of mint production. Chives only had an interest as being cute. So I disregarded Fennel, Basil, Cilantro, and Oregano to get to sage.

    I’ve had a rough history of growing my own herbs recently. My cilantro was stolen from my front porch, the oregano is trying to crowd out other plants in its pot, and I refuse to plant mint since it grows so easily here. I’ve had no problems with sage, however. I’m growing Sage in a pot, but it is thriving like it’s going to colonize the yard. If I don’t harvest the leaves frequently it threatens to crowd out a neighboring thyme plant. I recently freed up some garden space and may just give it a chance to start its colony after all.

    Storage: Store your sage alive! The plant is obviously easy to grow even for this novice. If you have to buy yours at the store it keeps well in a plastic bag with a piece of paper towel. Kayln talks about the possibility of freezing it for one of her WHB entries. Jeanne talks about drying them for a WHB entry.

    Uses: Sage can be used as a tea to drink over at Haalo blog for a WHB entry. Other uses are poultry stuffing, salads, breads, cheese spreads, and in basting mixtures for broiled pork or salmon. I have personally enjoyed the woodsy flavor of sage in sausage. Unlike most fresh herbs sage stands up to long cooking times that temper its strong taste.

    Flavor Enhancers: Using too much sage creates a musty flavor in food. Apples compliment the taste. Sage is a great addition to various salt, oil, or vinegar mixtures. It pairs well with rosemary, thyme, savory, and oregano as well as the lemon herbs

    Health Notes: Scientists are currently testing the effects of Sage on Alzheimer's patients. It is thought to combat the chemical that is found lacking in their brains. The tea helps during cold season by calming sore throats and coughs. You can also use the fresh leaves as a toothpowder by rubbing them on your teeth to clean them. There are many more uses listed for herb medicinal use. It contains high levels of vitamin A & C.

    Safety Notes: smelling sage oil can cause intoxication and giddiness. If you are pregnant only use this as a culinary seasoning and not for medicinal purposes. Alcoholic infusions can be highly toxic. The essential oil can be poisonous in too large of doses.

    Meeta has a similar post from a past entry but she is braver than me in her ability to make gorgeous gnocchi – and hers doesn’t disintegrate.


    Ravioli with Brown Butter Sauce and Fried Sage Leaves

  • 1 package of whole wheat four cheese ravioli (or other stuffed pasta)
  • ½ stick of butter
  • 1 clove of garlic
  • 4 sprigs of sage


  • 1. Boil ravioli per package directions
    2. About a minute or two before the pasta is done, melt butter till browned.
    3. Grate garlic into butter.
    4. Drop one sage leaf in to make sure the temp is high enough; you should hear a crackling noise. Then drop the rest in until they turn a slight browned or grey color depending on your sage variety.
    5. Remove and pour over ravioli


    Recipe Follows

    9.23.2006

    SHF 23: Steamed Bao

    Steamed Bao, in all forms, is a favorite lunch or snack for me. I particularly like the Sweet Lotus Seed Paste and Red Bean Paste buns from Uwajimaya in Portland, OR. These may seem run of the mill but I still like them. Since this month’s theme was surprise inside, a variation of Bao seemed like a perfect idea.

    Nic’s Baking Sheet blog inspired me to try making steamed buns before, but without success. Maybe this was due to old ingredients. Further investigation of who motivated Nic made me think I should try Steamed Buns again. The post at I was really just very hungry helped me make buns that turned out soft and moist –not containing weird lumps as I experienced previously.

    Now for the surprise: I mixed together a nice ganache and place a bit of crystallized ginger or chili spiced mango. The ganache is very sweet and this added ingredient adds a little extra sweet or a little spice. Served warm, the buns are tasty and the centers soft. I prefer to dip a piece of the bun into the gooey chocolate. Adding one sliver of ginger or mango worked well, but next time I will chop the dried fruit up into smaller pieces and mix into the ganache more complete experience of the added flavor.

    Rice flour is traditional in making bao. A Chinese friend gave me some and that added to this recipe.


    Chocolate Ganache (truffle thickness)
    From Sally’s Place
    • ½ cup Heavy Cream
    • 8 oz semi-sweet chocolate, chopped into small pieces.
    • Crystallized Ginger or Chili Spiced Mango cut into 1 cm squares
    1. Place cream in a sauce pan over high heat, bring to a boil, then remove from heat.
    2. Immediately add chopped chocolate, beating vigorously until well blended. If chocolate mixture becomes stiff, place the bottom of the pan in another pan of hot (not boiling) water to soften the chocolate.
    3. Let cool.
    4. When slightly thickened, separate Tablespoon-sized scoops of ganache on a paper plate
    5. Place the ganache into the freezer for up to 10 min.
    6. Slide your cut bits of ginger or mango into the ganache balls
    • 7 cups of all-purpose flour (I mixed together rice flour and all-purpose flour. 3 c of all-purpose flour and 4 c of rice flour.)
    • 4 ½ t active dry yeast
    • ½ c sugar
    • ¼ c lukewarm water
    • 1 c boiling water
    • 1 c warm whole milk
    • 2 T vegetable shortening
    • 1 t baking powder
    • Parchment paper, cut into 24 3” squares
    1. Proof the yeast in a bowl with ¼ cup of warm water and a pinch of sugar until foamy.
    2. In a large bowl, put in 5 cups of the flour (3 all-purpose and 2 rice). Make a well in the center, and add the hot water and mix well. Add the yeast mixture and the rest of the ingredients except the extra flour. Mix well. Continue adding rice flour a little at a time till the dough no longer sticks to the bowl.
    3. Place on a floured kneading bench, knead till soft and pliable.
    4. Place in a large plastic zip lock bag. Leave it to rest until the bag bursts open. (45 min to 1 ½ hour).
    5. Roll the dough into a long sausage and cut into 24 pieces. Roll each piece into a ball and let rest a few minutes.
    6. To fill the buns, flatten each ball so that the middle is slightly thicker (a thin spot will allow the goo to rupture). Put a ball of your previously-separated ganache into each bun. (Using a spoon kept melted chocolate off my hands and the dough.) Gather up the edges and pinch together firmly to seal, then turn over and place on a parchment square. Let buns rest another 15-20 min before steaming.
    7. Steam in a steamer for 20 min. Eat piping hot.
    8. Extra buns freeze well for later use (don’t steam first).

    Note: I was wrong about freezing and then cooking the buns. Steam them according to the recipe and then freeze. TO eat remove from freezer and steam for 5 min or microwave wrapped in a damp paper towel for 1 minute.
    I don't feel my photos are quite up to par on this post due to some technical problems. I will add better photos later this weekend when I steam more bao for lunch.

    Recipe Follows

    9.20.2006

    Don’t Get So Parsnippety


    About a week ago, I had a friend over for some cooking, relaxation and a good movie. We had a side salad and main dish of fish topped with veggies. Something was missing. That something turned out to be parsnips. I had seen this recipe years ago, but hadn’t been near a parsnip until it appeared in my CSA share.

    The only hitch to the meal was a minor mishap with my favorite tool. This side of parsnip & chestnut croquettes really made the meal. They were like healthy mozzarella sticks. So mentioning parsnips might be the only turnoff for this recipe. Thanks for reading my entry for Weekend Herb Blogging over at Kayln’s Kitchen this week.


    Storage: Remove the tops and placing the parsnips in the fridge. They will keep in a plastic bag for several weeks. If you happen to grow this root vegetable, store them in the ground and pick them fresh. In many places, you can leave them in the ground during the winter until spring growth starts. For longer storage, you can blanch, cool, thoroughly dry and then freeze them. Also parsnips stay nicely in a root cellar for 8-10 days or longer based on your location.

    Uses: Parsnips can be eaten raw, baked, sautéed, steamed, or boiled and mashed like potatoes. Parboil these white roots before adding them to dishes, as they usually need a long cooking time to develop and release their flavor. Watch out for overcooking, however, because they can get mushy. During the middle ages parsnips, were used as a sweetener like carrots. They were the main starch since potatoes had not been introduced. For variety, substitute parsnips for carrots, potatoes, and sweet potatoes. Wash them as you would carrots, but they only need to be peeled if tough. In less common culinary applications, parsnips are made into jams, desserts, beer and wine. This is mostly found in traditional English cooking. Parsnip wine has a sherry like flavor to it and is a highly prized country wine.

    Flavor Enhancers: Parsnips have a nutty, spicy or peppery flavor that blends well with Cinnamon, Ginger, Orange, and Tarragon. Butter and honey are a simple way to bring out the flavors.

    Health Notes: Parsnips are an excellent source of vitamin C and Folic Acid. They are believed to be first-rate detoxifiers and help fight some cancers.

    Safety Notes: If you are looking for these in the wild be very careful since they look very similar to poison hemlock.

    This recipe utilized some very creative improvisation. My husband, God bless him, bought water chestnuts instead of chestnuts. My friend tried to soften them with boiling, but of course water chestnuts are eternally crunchy. We also had a hard time following the directions.

    Parsnip & Carrot Croquettes

    Loosely adapted from The Best-Ever Vegetarian Cookbook by Nicola Graimes and repeated in The Vegetable Encyclopedia and Cookbook by Christine Ingram verbatim.

    • ½ lb parsnips and carrots, cut roughly into small pieces
    • 2 T butter
    • 1 large garlic clove
    • 1 T cilantro, chopped
    • salt and pepper
    • 1 egg, beaten
    • 1 ½ oz seasoned bread crumbs
    • walnut oil or other vegetable oil for frying  (this is to make up for the lack of nuts)

    1. Cover parsnip and carrots with enough water in a small saucepan. Bring to a boil, cover and simmer 15-20 minutes
    2. Melt the butter in a butter warmer or saucepan and cook garlic till fragrant. Drain the parsnip and carrot mixture and mash with garlic butter. Stir in cilantro. Season with salt and pepper. Mix egg till sticky. Mix in bread crumbs till just combined.
    3. Form 1 Tablespoon amounts into logs and place in hot oil. Using a slotted spoon. Turn till all sides are browned.
    4. Drain on a paper towel and serve.

    please forgive the lack of extra photos. You can see the in process photos here. Blogger is crashing firefox every time I try to compose and add pictures.

    Recipe Follows

    9.12.2006

    Carroting Around the Issue

    If I haven't posted much recently, it is because I've been buried under lots and lots of produce. Nobody piled heaps of fruit on top of me, but I have been struggling to can things before they go bad. So far I have done two more batches of strawberry-rhubarb jam, tomato jam, red hot cinnamon wedges. Next on my agenda is tomato preserve, followed by salsa, apple butter and tomato sauce. It's been so exhausting that after this post I'm taking a break to knit up a cute top. I wish I was kitting along with the ladies at Sexy Knitters Club, I will just have to dive into Knitty for some free patterns.

    In the future my goal is to post once a week. Expect to see a lovely veggie introduction on the Weekend Herb Blog Round-up the brainchild of Kayln's Kitchen. The goals seem to match up with my desire to introduce things for you the readers to be able to learn more about and to maybe add your own experiments to the Weekend Herb Blog. Anything else will be a happy suprise.

    The carrots I recieved in my farm share this week were crying for some special attention. The results were this delicious carrot bread:


    Storage: Cut off the green tops and place carrots in perforated plastic bags in the veggie drawer. (Stab a ziploc a few times to let the bag breathe and get out any aggressive feelings). The carrots should keep 1-3 weeks this way. If they become limp, you have two choices - soaking them in icy water can revitalize them or turn on the creative juices and make a baked treat! Carrots can be kept frozen also, but remember to blanch them before placing in the freezer Also carrots were the first veggie to be canned, so grab your pressure cooker and save all those sweet slices.

    Uses: Carrots are a great addition to salads as well as a great snack. Steaming allows more of the available vitamin and minerals to be processed by your body. But that of course is only the beginning, Fall has arrived and with it the ubiqitous soups, stews and casseroles. At other times of the year or now you can try this delicious veggie roasted, boiled, stir-fried, grilled, pureed, sauted, fried, or baked. Carrot Juice is another tasty alternative with less benefits.

    Flavor Enhancers: Bay Leaves, Chives, Cilantro, Cloves, Curry, Dill, Ginger - fresh or ground, Honey, Mace, Maple Syrup, Marjoram, Mint, Nutmeg, Parsely

    Health Notes: Carrots pack a wallop in the Beta Carotene and Vitamin A camp, but also let some other vitamins tag along such as B3, C and E. If you eat them raw you get additional benefits from 4 other minerals - potassium, calcium, iron and zinc. These sweet veggies will not raise your blood sugar but rather lower it. Bring on the carrot cake! Oh, wait that has sugar.

    We all grew up being told one of two things as a kid. Most commenly that we would have improved eye sight from eating carrots. Less common is the belief that you will gain a natural tan by ingesting large amounts of carrots (they told us this at my high school to get the girls to eat their veggies). The Germans stared speculating about improved eyesight of the British during WW2 during air raids, since the British populace ate lots of carrots. This was not accurate because of carrots but rather for the multiple radar stations. It is true that lack of vitamin A causes night blindness so eating a carrot every couple of weeks can be beneficial. Most of the carrot's nutrients are found in the outside wall. To preserve this, eat them freshly washed. If that turns you off, take a sharp knife and scrape away a thin layer. Only peel really thick carrots.

    Safety Notes: If you do eat a lot of carrots to prove that they will give you a tan, be prepared for yellow skin or at the least slightly orange skin. Avoiding them for a while will reverse the coloration. If you don't return to your normal color in two weeks, consult a doctor about jaundice. Amazingly carrots can help combat food poisioning by killing some food-poisioning bacteria. So next time you travel make friends with some nicely bleached and rinsed carrot sticks instead of the chalky pink bottle. Much more tasty.

    Raisin-Carrot Bread
    loosely adapted from Better Homes and Gardens New Cookbook
    I doubled the recipe but this makes a single loaf


    • 3/4 c raisin yellow raisins were used for extra color
    • 1/4 c rum or orange juice I used Bacardi but wonder if carrot juice would be good
    • 1 1/2 c all purpose flour
    • 3/4 c sugar
    • 2 t baking powder
    • 1 t ground cinnamon
    • 1/2 t salt
    • 1/4 t ground allspice
    • 1 egg
    • 1 c finely shredded carrots (about 3 large carrots made enough for two loaves)
    • 1/4 c cooking oil
    • 3/4 c chopped walnuts
    1. Spray the bottom of bread pan with oil. In a small bowl begin intoxicating the raisins with the juice.
    2. In a 2nd larger bowl, mix dry ingredients to create a well in which to later add wet mixture.
    3. In 3rd bowl - hopefully you have enough - combine egg, carrots, and cooking oil. Throw in the now bloated-with-goodness raisins. Once all is mixed together, place in the well of the dry mixture and combine till just moist.
    4. Gleefully dump into pan. Bake in average temp oven of 350F until toothpick passes the clean dip test. This was about 50 min for me. It should not be more than 60 min. Cool on racks.
    5. Eat small chunks of the fresh warm bread to savor the hint of rum. Then send to work with your husband to feed the rest of the crew.


    Recipe Follows

    9.03.2006

    I'll Show You Mine If You Show Me Yours #4 - What can you not live without?


    The item I can’t live without are my microplane graters. When my husband and I got married, I was so excited to register for these. I had other graters but those pale in comparison to how easy these are to use. Since then I have gotten rid of almost all of the inferior ones except for one to grate small amounts of mozzarella and cheddar. I have been known to take them camping and to my mother-in-laws just so that I don’t have to zest an orange with a zester (I have never gotten one to work for me) or to get the cloves of garlic just so on a trip.

    This is an event hosted by Sweetnicks. Posted by Picasa

    Recipe Follows

    Weekend Cookbook Challenge: “A Taste of Asia”


    I debated a lot about what to cook for the Weekend Cookbook Challenge. Since I was supposed to use a cookbook that doesn’t get used often, my first inkling was my garage sale special – a French cookbook that I bought for 25 cents. I bought it and then never opened it for 8 years. Alas, it was already donated to the Boy Scouts’ garage sale.

    We have Mediterranean food often as my parents have lived there since 1991, so that got vetoed. I pulled out my Chinese cookbook from Australian Women’s Weekly (my favorite series of cookbooks) without much inspiration. My choices thus narrowed down, I found a really cool Crate and Barrel cookbook some friends gave us for our wedding. Each page of the “book” is really a flash card with a picture on the front and recipe on the back. It makes me think of ordering at an Asian restaurant – except that I do all of the work. I love eating dim sum, sushi, steamed foods, noodles and rice with the spice flairs for the Orient. Hong Kong remains my favorite trip for the cuisine. If I could go back again, I would hop from one temple restaurant to another – so many good mixes of flavor. If I had a recipe for sweet and sour fried walnuts, I would have made it without question.

    Other factors made my choices easy as well – I refuse to pull ink sacks from baby squid. It seems too much like preparing the kind of sushi you could die from.

    Being thus inspired, I scheduled several days to prep the food and invited several friends over for a dinner party.

    Here was our menu: (I must say the names are very basic – I wish I knew the correct names)

    Soybeans with peanut sambal
    Make sambal – 1 day ahead
    Shell beans – well I forgot this till almost the last minute
    Soybeans steamed 2-6 min – aprox start 6:15pm

    Herb and Chicken Spring Rolls

    Cook chicken – 1 day ahead
    Assemble rolls – 3hrs ahead – 3pm
    Make dipping sauce – 1 day ahead

    Sticky rice with chicken skewers

    Marinate chicken night before
    Cook rice in the morning
    Wrap rice – 12pm
    Steam rice 10min – 6:15pm
    Broil chicken 12 min – 1pm
    Make sweet chili sauce – 1 day ahead or more

    Spicy Tuna Roll
    Make seasoned rice – 1 day ahead (I probably should have done it about 1 or 2 pm that day)
    Make rolls – 2 hrs ahead – 4pm

    Black Rice with red fruit
    Soak rice overnight
    Soak bamboo steam – 1st thing in the morning (I know they say don’t on the care instructions but its fine.)
    Steam rice 1hr – 10am
    Make syrup 15 min before rice is done – 10:45am
    Serve cool – room temp

    Keep warm stuff in oven on low till people arrive

    The party was a blast. Preparing the food on multiple days kept me from feeling overly stressed, although it was a lot of work. Our guests were amazed that I had never made any of this kind of food before. They loved it and ate almost everything. We had one left over pudding and some spring rolls and sticky rice. I have posted the pictures over at my flicker site


    Here is a recipe to wet your appetite. If you want any of the others let me know and I will post them later in other blog entries.

    Herb and Chicken Spring Rolls
    Makes 24

    4 skinless, boneless chicken breasts, about 6 oz/150g each

    1/4 cup/4 T dark soy sauce

    2in/5cm fresh ginger, peeled and grated

    2 garlic cloves, crushed

    2 T Shao Hsing (Chinese rice wine) or dry sherry (optional)

    24 small rice papper wrappers, 6 1/2 inches/16 cm diameter

    a small bunch of cilantro

    a small bunch of mint

    a small bunch of Thai basil

    dipping sauce (optional)

    1/2 c/100g sugar

    freshly squeezed juice and grated zest of 2 unwaxed limes

    2 green chiles, thinly sliced

    1/3 c/80 ml white rice vinegar

    1. Put the chicken in an oven cooking bag, add the soy sauce, ginger, garlic, and sherry, if using. Knead the bag so the chicken is throughly coated. Marinate in the refriferator for at least 2 hours or overnight.

    2. Transfer the chicken in the bag to a roasting pan and cook in a preheated oven at 350F (180C) Gas 4 for 40 minutes. Remove from the oven and let cool in the bag. Slice each chicken breast diagonally into 12 pieces, transfer to a plate, and pout any juices over it.

    3. To assemble, dip a rice papper wrapper in warm water to soften. Put it on a damp work surface and top with 2 pieces of chicken and a few leaves from each herb, then wrap up. Repeat until you are out of wrappers.

    4. To make the dipping sauce, if using, put all the ingredients in a saucepan, bring to a boil, and simmer fast for 5 min. Transfer to a small bowl and serve with the spring rolls.

    Recipe Follows

    9.02.2006

    Do you Zucchini?


    Everyone jokes about the high productivity of zucchini. Who hasn’t had a gardening friend try to pawn off some of his overgrown surplus? I fondly recall a series of Fox Trot comics where the mother thinks she’ll get a dozen zucchini because she planted a dozen plants. Then she spends the rest of the summer harvesting. This year the joke was on me - namely because my own plant didn’t produce. I started a few and gave some to friends. They have zukes now while the one I kept is taunting me.

    I received zucchini in my farm share last week and immediately knew what I would cook with it – zucchini lasagna. My plant must have been inspired too, because it put out a blossom. I’m a huge fan of squash while my husband is a detractor. The lasagna was going to be made with yellow squash, but when the menu changed to zucchini he brightened a little, even complimented me on it, and then wanted seconds.

    So here’s my entry into the Fiesta al Fresco at La Mia Cucina and Cream Puffs in Venice:

    Storage: Refrigerate in a plastic bag in the veggie drawer and use within 2-7 days. The older they get the less flavor they retain. You can also freeze them, but first slice or grate it and blanch it (dump in boiling water for 2 minutes then transfer to a cold water bath).. You will notice blanching was effective because the zucchini becomes translucent. If you love Zucchini bread, you can freeze the bread or just the grated veggie to save space. The blossoms are also edible and will keep for 1-2 days in an ice water bath in the fridge. Alternately, seal them in a plastic bag blown up with air and tied shut.

    Uses: raw in salads or just plain, steamed, sautéed, baked, grilled, included in stews and soups and even shredded and baked in a cake or bread. Since it is a summer squash, it may be substituted with any other summer squash. The zucchini flower is a delicacy and can be stuffed, fried or eaten raw in salad. Be very careful not to overcook zucchini since it tends to get soggy – like really bad cafeteria veggies. To avoid watery dishes when cooking, lightly salt your fresh-sliced zucchini and place on a paper towel. The towel will soak up some of the water in a few minutes. Rinse off the salt and continue to prepare your dish.

    Flavor Enhancers: Garlic, Onions, Tomatoes, Sesame Seeds, and of course salt and pepper. Herbs and spices to use are marjoram, cumin seeds, parsley, dill, rosemary and savory.

    Health Notes: Zucchinis are a diuretic to help remove toxins from the body. Also they are high in potassium which is helpful to all of us who suffer from high blood pressure. 1 cup of sliced zucchini is only 20 calories. The fiber in the zucchini also helps to lower cholesterol. Also high in vitamin C and manganese.

    Safety Notes: This vegetable is completely unsuitable for canning. It turns to mush and there is no know method to keep it via canning methods. You can use it in pickling in place of cucumbers.


    This dish was amazing. It made four servings, which provides a good dinner for two and leftovers for lunch the next day. This makes me remember to eat lunch on a regular basis. The lasagna almost didn’t make it to lunch because it was so yummy. This will definitely go on the regular cycle of dishes.

    Zucchini Lasagna
    From Everyday Food September 2006 (with my own mix up)
    Serves 4

    Prep Time; 15 min
    Total Time: 1 hour

    Olive Oil, for baking dish

    8 oz reduced-fat cream cheese, room temperature (this is really important)

    1 container (15 oz) part-skim ricotta cheese

    Coarse salt and ground pepper

    2 medium zucchini (8 oz each), halved lengthwise, then sliced thinly crosswise

    1 garlic clove, minced

    2 t. dried oregano

    6 no-boil lasagna noodles

    2 oz part-skim mozzarella cheese, shredded (1/2 c)

    1. Preheat oven to 425O. Lightly oil an 8 in square baking dish; set aside.
    2. In a medium bowl, stir together cream cheese and ricotta; season with salt and pepper. In another medium bowl, combine zucchini, garlic, and oregano; season with salt and pepper, and toss to combine.
    3. Spread ½ zucchini mixture in prepared baking dish; top with 2 noodles, then ½ ricotta mixtures, place 2 more noodles and repeat with the remainder. On top of the ricotta mixture sprinkle the mozzarella. (It was supposed to be divided in thirds but i miss read.)
    4. Cover baking dish with aluminum foil; bake until bubbly and noodles are tender, 30-35 minutes. Remove foil; bake until golden brown, 15-20 min more. Let stand 10 min before serving.


    Recipe Follows